In this post you will find all the information you need to recreate this look including products and tools used. Enjoy!
LET'S GET PREPARED
I'm extremely picky about the brushes I use for eye make-up (I have over 60 of them), some are professional and others I have picked up here and there at drug stores and larger retail outlets. I find that just because a brush has a fancy price tag, it doesn't always work for me and the look I'm going for. I tend to also use brushes in unconventional ways. For example, using a lip brush for eye brow shading or eye liner application, etc. I tend to keep the brushes I use most often in my tool belt and the others kept aside for specific occasions. I am not particular to any one brand of brushes, but as a vegan, I try to avoid animal hair as often as possible.

These are probably my most used brushes (as you can see by the wear!). I have labeled them in the photograph according to where I used them for this look.
FROM TOP TO BOTTOM
MAC 242 Brush
Lancome 8 Brush
Essence Of Beauty Small Crease Brush
Essence Of Beauty Large Crease Brush
LET'S GET TO WORK
I will not be including my foundation, blush and bronzer routine in this post.
Just know, that I always finish my face and eyebrows before moving onto my eyes (this is a matter of preference and is just easier for me).
PRIMER/BASE
I'm also pretty unconventional with primers. When using mineral pigments, I like to stick to something in the "face paint" category, whether it be cake or cream. Depending on the products used, it can work a lot better than even the most expensive primers. In this case, I used Rubie's Cream Make-Up in White (which cost me $1 and can be purchased at party stores all year round) and Chrome Serum by Glittersniffer Cosmetics which is a pigment foiling medium I use when I need the color to appear more rich and most importantly, to have more control, which can sometimes be difficult with loose eye shadows.
Using my finger to apply Rubie's Cream Make-Up in White, I blended from my eye lid to my brow bone, covering my entire eye area, but excluding the lashline. I knew I wanted to have a defined shape and didn't want to soften any lines with a highlight color. Using a white cream creates a lighter color which appears as a highlight but is actually a base at the same time.

PIGMENTS (Handmade by Glittersniffer Cosmetics)
Lately, I have been using many products from this brand. I have always had trouble with loose eye shadows and pigments, but once you get the hang of working with them, it becomes quite easy and you discover new ways to make them even more workable. The following 3 pigments were used in this look and labeled accordingly. Unfortunately, these pigments were not named so I don't have specific product information to share. I do know, that these are probably in my Top 5 of the 30-something Glittersniffer pigments I have. 

MAKE-UP APPLICATION

Here is a video with more detail of the pigments themselves.
They contain so much glitter that it's hard to see it in a still picture.
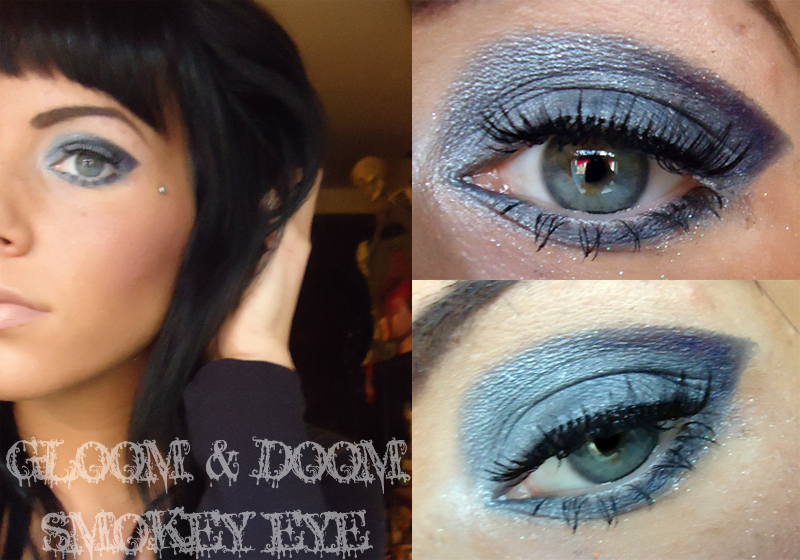
INNER CORNER: After the entire eye area had been primed with the cream base, I took the MAC 242 Brush and applied the lightest silver color from my inner corner to the middle of my lid (as well as using the Essence Of Beauty Small Crease Brush to line the inner corner of the lashline to mid-lashline). I made sure to apply it to just the inner corner at first because I wasn't sure how dramatic I wanted to go with it just yet. I used the same brush to apply more pigment over the same area to add strength, blending towards the middle of the lid and crease line each time I applied more product. This method and placement would determine the application of the other two colors used.
LID: Next, the dark gray color. Using the Essence Of Beauty Large Crease Brush, I applied this smokey gray color to the middle of my eyelid and blended towards the crease and outer corner.
OUTER V: For the final step, using the Glittersniffer Cosmetics Chrome Serum, I dampened the Lancome 8 Brush just enough so it would turn the dark purple pigment to a slightly creamy texture when applied to the skin (almost like a gel eyeliner). Following the curve of my bottom eyelid, I drew a line extending from the corner of my eye towards the direction of the tail of my eyebrow (in the same way you would with a cat eye or liquid liner). Then, using the same damp brush, I drew a line that connected the previous line towards my crease, creating a "V" shape or triangle. Using the Essence Of Beauty Small Crease Brush, I filled in the "V" and blended it into the bottom lashline and lid color.

SIDE NOTE: I have had this discussion with other make-up artists, and most I have met believe that you should always line the waterline when doing smokey eyes. I almost NEVER do this. Why? Because I want my eyes (or my clients eyes) to look wide and awake. Lining the inner eye with a dark liner (black, gray, purple) will make the eyes look smaller because dark colors create the illusion of recession. I can appreciate the look, but it's my personal preference not to do it. I do like white or silver liner though!
FINISHING TOUCHES
I tend to use false eyelashes for almost all of my looks, wearing them at least 5 days a week. Applying false lashes easily can take a lot of practice and I have to say, this was not my best effort! This was a new pair of lashes from a company I had never used before called Salon Perfect. These were horrible to work with! They kept bending awkwardly and didn't work well with the eyelash adhesive. All in all, I tried to mask how much of a mess they turned out! I won't be purchasing from them again, but I have to say I am in love with the Revlon Precision Lash Adhesive. It's the only one I've used that actually dries clear! Before applying the false eyelashes, I used MAC False Lash Mascara in Black on my top and lower lashes. MAC Eye Pencil in Spiked was used for my eyebrows.

THE FINAL LOOK


Now of course, you can always go in and clean up any "fall out" with a Q-tip and some make-up remover.
Pardon my brows, they're growing out!
Thanks for reading and enjoy the look!
xoxo
Jane
No comments:
Post a Comment